![[RIMMF]](/w/lib/tpl/dokubook/images/dokuwiki-128.png)
Table of Contents
Add a Caption
A caption is a grouping mechanism for elements. You may create captions in template mode only; however, any caption that you create in template mode is added to your options and will always be available later in the same context (ie. a caption for a Work record will be available in other Work records, but not in Manifestation records, etc.)
Add a Caption: Quick Steps
- Put your cursor on the element label that is directly below where you want your new caption to be inserted (go here instead, if the element is to be inserted at the end of the record/template)
- Press the <Insert> key
Either: Choose from a list of already assigned local captions appropriate for the entity (if there are any)
- Click on the empty Element Label box, and then the down arrow to choose from a list
- Select an existing caption
- <Tab> to complete the step
Or: Enter a local caption name
- Click on the empty Element Label box, and enter a caption name
- <Tab>
- Indicate “What Kind of data is this?”: Caption
- Indicate the Source of the Caption
- Click <Submit>
Add a Caption: Detailed Steps
A caption is a grouping mechanism for elements (or vocabulary terms) that can also help to explain the purpose of the elements that come under it, e.g., Title of the Work, Form of the Work, Date of the Work are all attributes for identifying a Work, and so are logically grouped under the “Attributes for identifying the work” caption shown below:

To add a local caption of your own to a template:
 Put your cursor on the element label that is directly below where you want your new caption to be inserted (go here instead, if the element is to be inserted at the end of the record/template; you can always move the caption after you insert it, if you wish):

- Press the <Insert> key; a blank row will appear


Either: Choose from a list of already assigned local captions appropriate for the entity (if there are any)—(this works for templates and records)
 Click on the empty Element Label box, and then the down arrow on its right
 - Select a caption label
- <Tab> to complete the step

Or: Enter a local caption name—(this only works for templates)
- Click on the empty Element Label box, and enter a caption name

- <Tab>
 Click the Caption button to indicate “What Kind of data is this?” (this is just a grouping label for a bunch of elements; it cannot contain text, but can be useful for organizing elements in a group that makes sense to you—you will be able to add or move your chosen elements to fit under the caption)
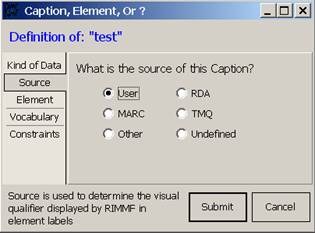 Indicate the Source of the Caption, e.g., “User” (do not use RDA or TMQ as a Source)
- Click <Submit>
- The program will add an appropriate element symbol for the source of the element, to the end of the label, e.g., “§” = User


You will be able to change these element settings later using Edit Elements

In a template: if you would like an added element to always appear for a particular type of record, then add that element in a template; the added element will always appear whenever that template is accessed.
In a record: do not add an element to a record; if you do, then that new element will show up as 'undefined' the next time you open the record. Only add new elements to templates, so that the software knows what to do with the data for that element, the next time you access a record that contains that element data.
